Building an Enterprise Compliance Pipeline with Coalesce
Overview
This hands-on lab teaches you how to build an enterprise-grade regulatory compliance pipeline using Coalesce and Snowflake. You'll create a system that tracks customer history, efficiently processes large transaction volumes using incremental patterns, and generates audit reports for SOX and AML compliance.
What You'll Need
- A Coalesce account (either a trial account created using Snowflake Partner Connect or access to an existing account).
- Basic knowledge of SQL and data warehousing concepts.
- A Snowflake account with access to
SNOWFLAKE_SAMPLE_DATA.TPCDS_SF100TCLdatabase.-
This is a large database. It's recommended to use a small sampling of the data. Specifically the
STORE_SALEStable. Try using:CREATE TABLE YOUR_TABLE.TPCDS_SF10TCL.STORE_SALES_SAMPLE ASSELECT * FROM TPCDS_10TB.TPCDS_SF10TCL.STORE_SALESSAMPLE SYSTEM (0.23); -- Adjust percentage to get ~65M rows -
A Snowflake warehouse (SMALL or larger recommended)
-
What You'll Build
- A complete compliance data pipeline with incremental processing
- Customer dimension with full audit history (SCD Type 2)
- Automated SOX and AML compliance reporting
- High-performance transaction processing system
What You'll Learn
- How to implement incremental data loading patterns
- How to create slowly changing dimensions for audit trails
- How to build compliance risk assessments
- How to generate regulatory reports
- How to simulate and test incremental loads
Understanding the Source Data
The TPC-DS dataset simulates a retail company's data warehouse, providing realistic volumes and relationships for testing enterprise-scale data pipelines. For our compliance pipeline, we'll focus on two critical tables that form the foundation of customer transaction tracking.
CUSTOMER Table
The CUSTOMER table contains master data for all customers in the retail system. This table serves as the source for our slowly changing dimension, allowing us to track customer information changes over time for compliance purposes.
Key Columns:
| Column Name | Description | Usage in Pipeline |
|---|---|---|
C_CUSTOMER_SK | Surrogate key uniquely identifying each customer | Business key for SCD Type 2 tracking |
C_FIRST_NAME | Customer's first name | Track name changes for compliance |
C_LAST_NAME | Customer's last name | Track name changes for compliance |
C_EMAIL_ADDRESS | Customer's email address | Risk indicator when missing |
C_PREFERRED_CUST_FLAG | Flag indicating preferred customer status (Y/N) | Used in risk assessment calculations |
The CUSTOMER table contains approximately 65 million customer records in the SF100TCL dataset, providing a realistic volume for testing enterprise compliance systems.
STORE_SALES Table
The STORE_SALES table captures every retail transaction, making it ideal for demonstrating high-volume incremental processing patterns. Each row represents a line item from a sales transaction.
Key Columns:
| Column Name | Description | Usage in Pipeline |
|---|---|---|
SS_SOLD_DATE_SK | Date key indicating when the sale occurred | Incremental load column (high water mark) |
SS_CUSTOMER_SK | Foreign key linking to the customer | Joins to customer dimension |
SS_ITEM_SK | Product identifier | Part of composite business key |
SS_TICKET_NUMBER | Unique transaction identifier | Ensures transaction uniqueness |
SS_NET_PAID | Net amount paid after discounts | AML threshold monitoring ($10,000+) |
The STORE_SALES table contains over 2.8 billion rows in the SF100TCL dataset. This massive volume is why we implement incremental loading patterns rather than processing the entire table repeatedly.
Data Relationships
The tables are connected through a foreign key relationship:
STORE_SALES.SS_CUSTOMER_SK→CUSTOMER.C_CUSTOMER_SK
This relationship allows us to:
- Enrich transactions with current customer information
- Track customer behavior over time
- Identify high-risk transactions based on customer profiles
- Generate comprehensive compliance reports
Compliance Relevance
These tables simulate common compliance scenarios:
- Customer Due Diligence: The CUSTOMER table provides identity information required for Know Your Customer (KYC) processes
- Transaction Monitoring: STORE_SALES enables detection of suspicious patterns and high-value transactions
- Audit Trail: The combination supports complete transaction lineage from customer to purchase
This tutorial uses the TPC-DS 100 TB dataset which contains over 2.8 billion rows in the STORE_SALES table. We'll use a simulation pattern to demonstrate incremental loading without processing the entire dataset.
Setting Up Your Environment
Let's configure your Coalesce workspace with the necessary packages and storage locations for our compliance pipeline.
Install Required Packages
-
Navigate to Build Settings > Packages.
-
Install the following packages:
- Snowflake Base Node Types (latest version)
- Snowflake Incremental Loading (latest version)

Build Settings - Package Install -
Give the packages a name. It's recommended to give them a name related to either the package name or use in your DAG.
Configure Storage Locations
-
Navigate to Build Settings > Storage Locations.
-
Create three Storage Locations to organize your compliance data:
Storage Location Purpose REGULATORY_RAWSource data ingestion REGULATORY_STAGEData transformation and processing REGULATORY_MARTFinal compliance reports and analytics -
Go to Workspace and select the Workspace you're using.
-
Click Storage Mappings.
-
Update your Storage Mappings to match your database and schema.
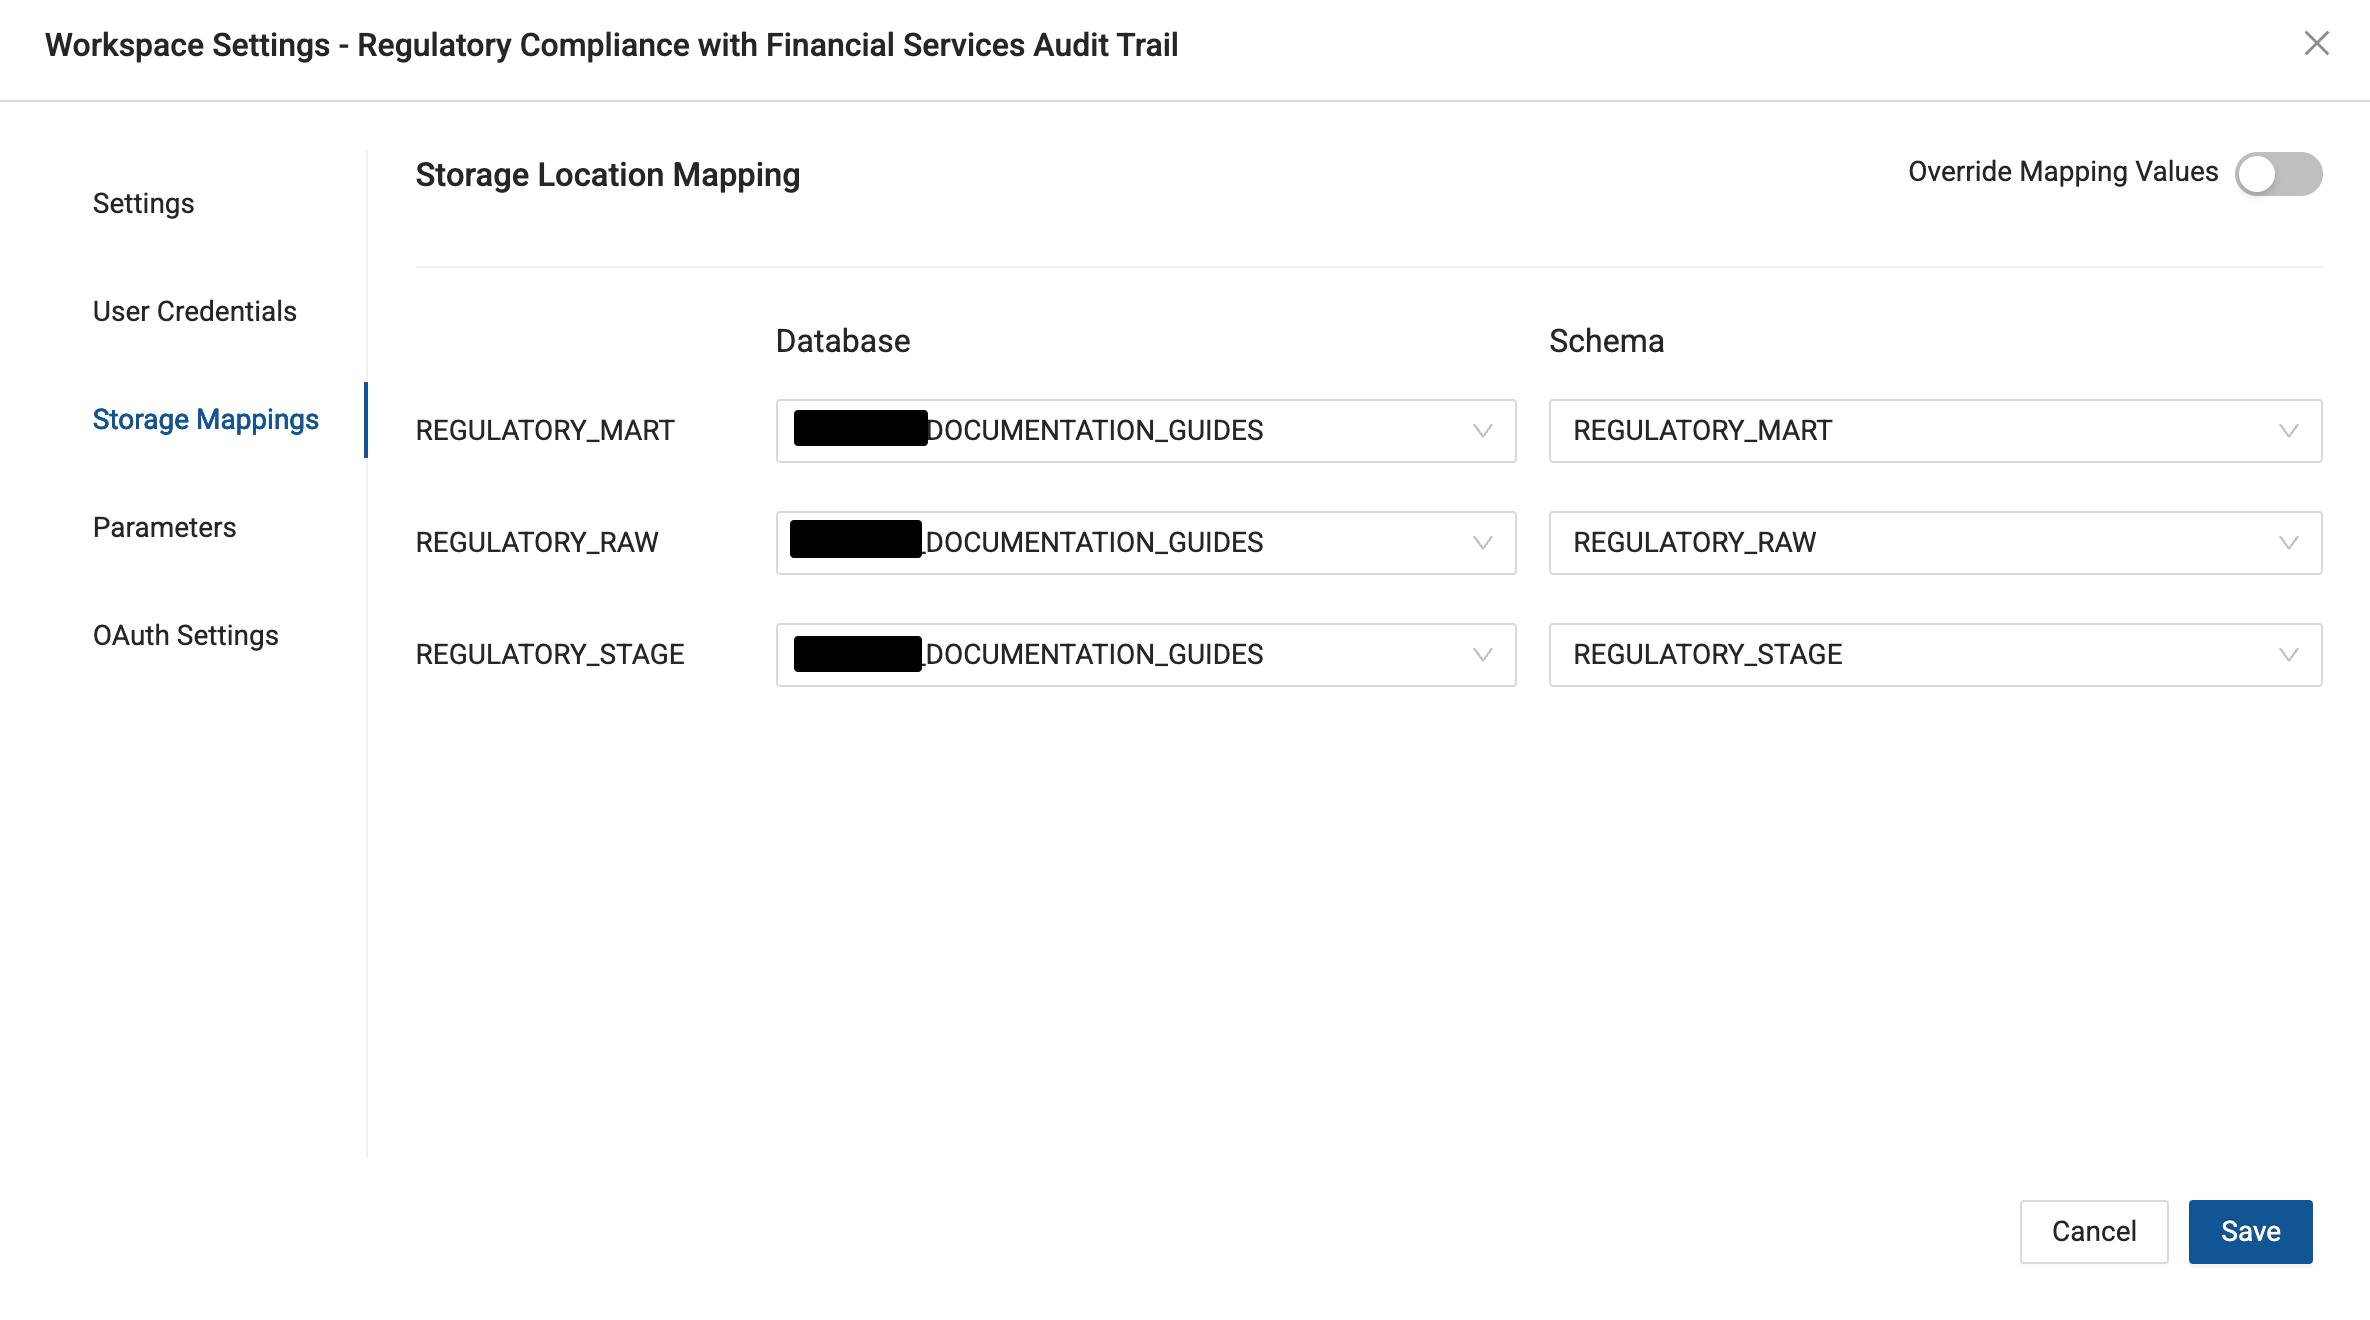
Separating data into distinct Storage Locations helps maintain clear data lineage and simplifies compliance auditing.
Connecting to Source Data
Now we'll connect to the Snowflake sample data that simulates our enterprise transaction system.
-
Click the + icon in the Build interface and select Add Sources.
-
Navigate to the
SNOWFLAKE_SAMPLE_DATA.TPCDS_SF100TCLdatabase or a database with a sample of data. -
Select the following tables:
- CUSTOMER - Customer data
- STORE_SALES - Transaction records
-
Click Add Sources to import the tables into your pipeline.

Add Sources
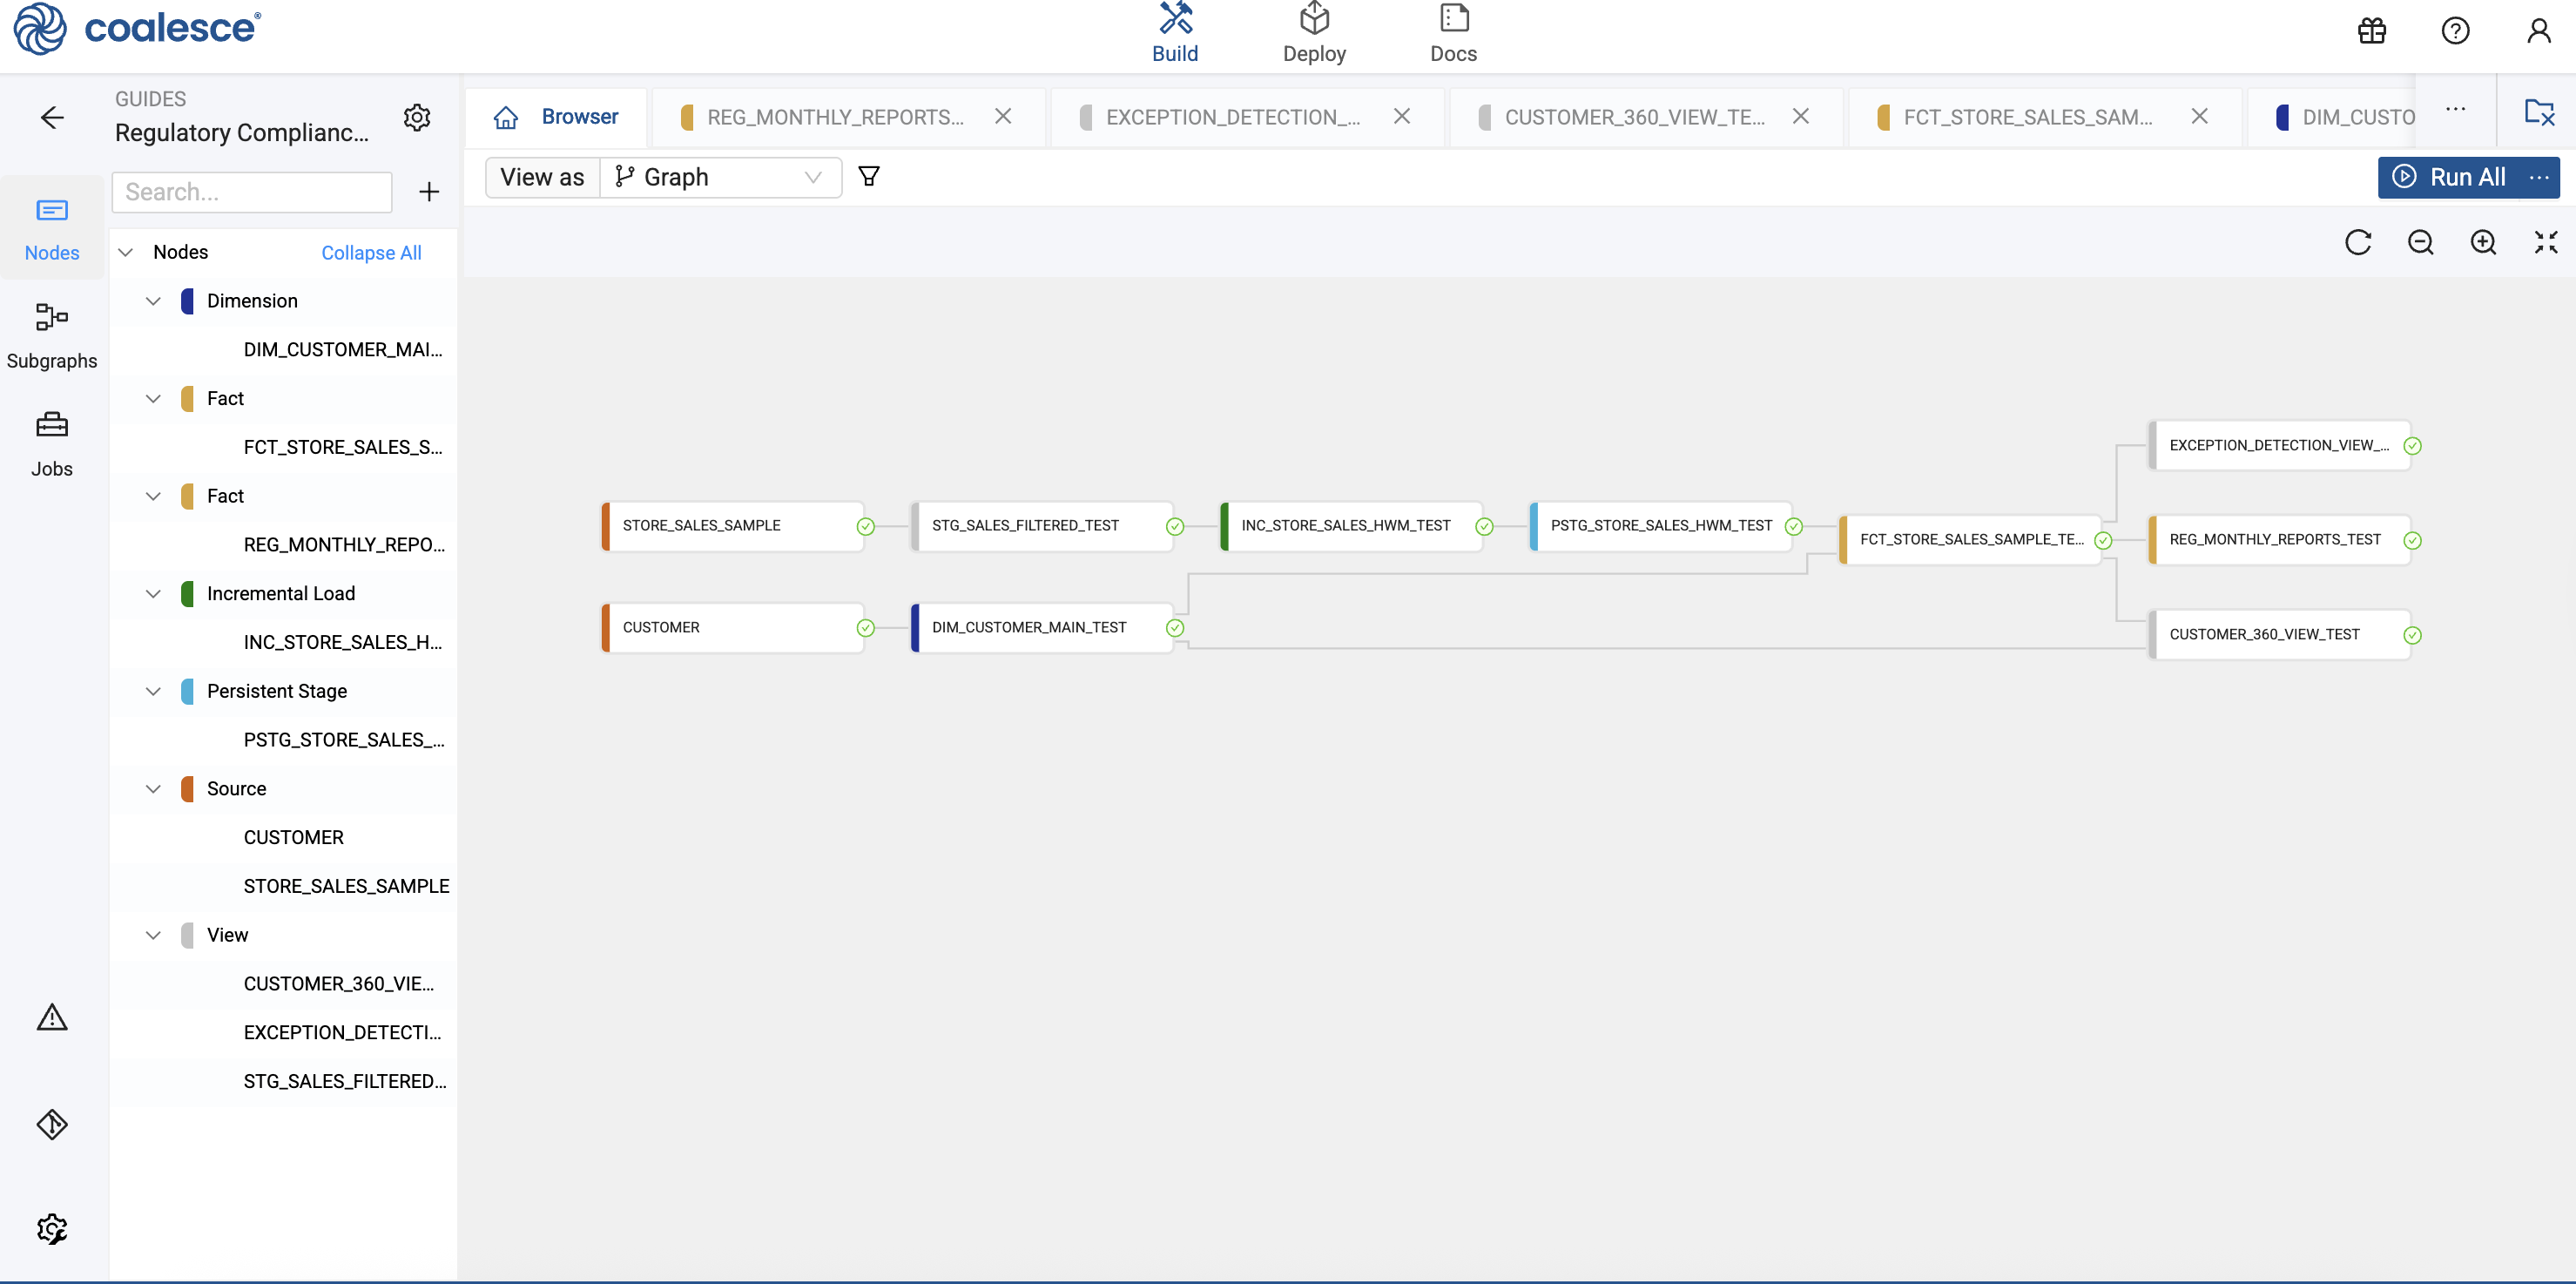
Building the Customer Dimension
To maintain a complete audit trail of customer changes for SOX compliance, we'll implement a Type 2 Slowly Changing Dimension.
Create the Dimension Node
-
Right-click the CUSTOMER source Node and select Add Node > Base Node Type Package > Dimension.

Right-click on the Customer Node to add the Dimension Node. -
Rename the Node to
DIM_CUSTOMER_MAIN. -
Configure the Node properties:
- Storage Location:
REGULATORY_STAGE
- Storage Location:
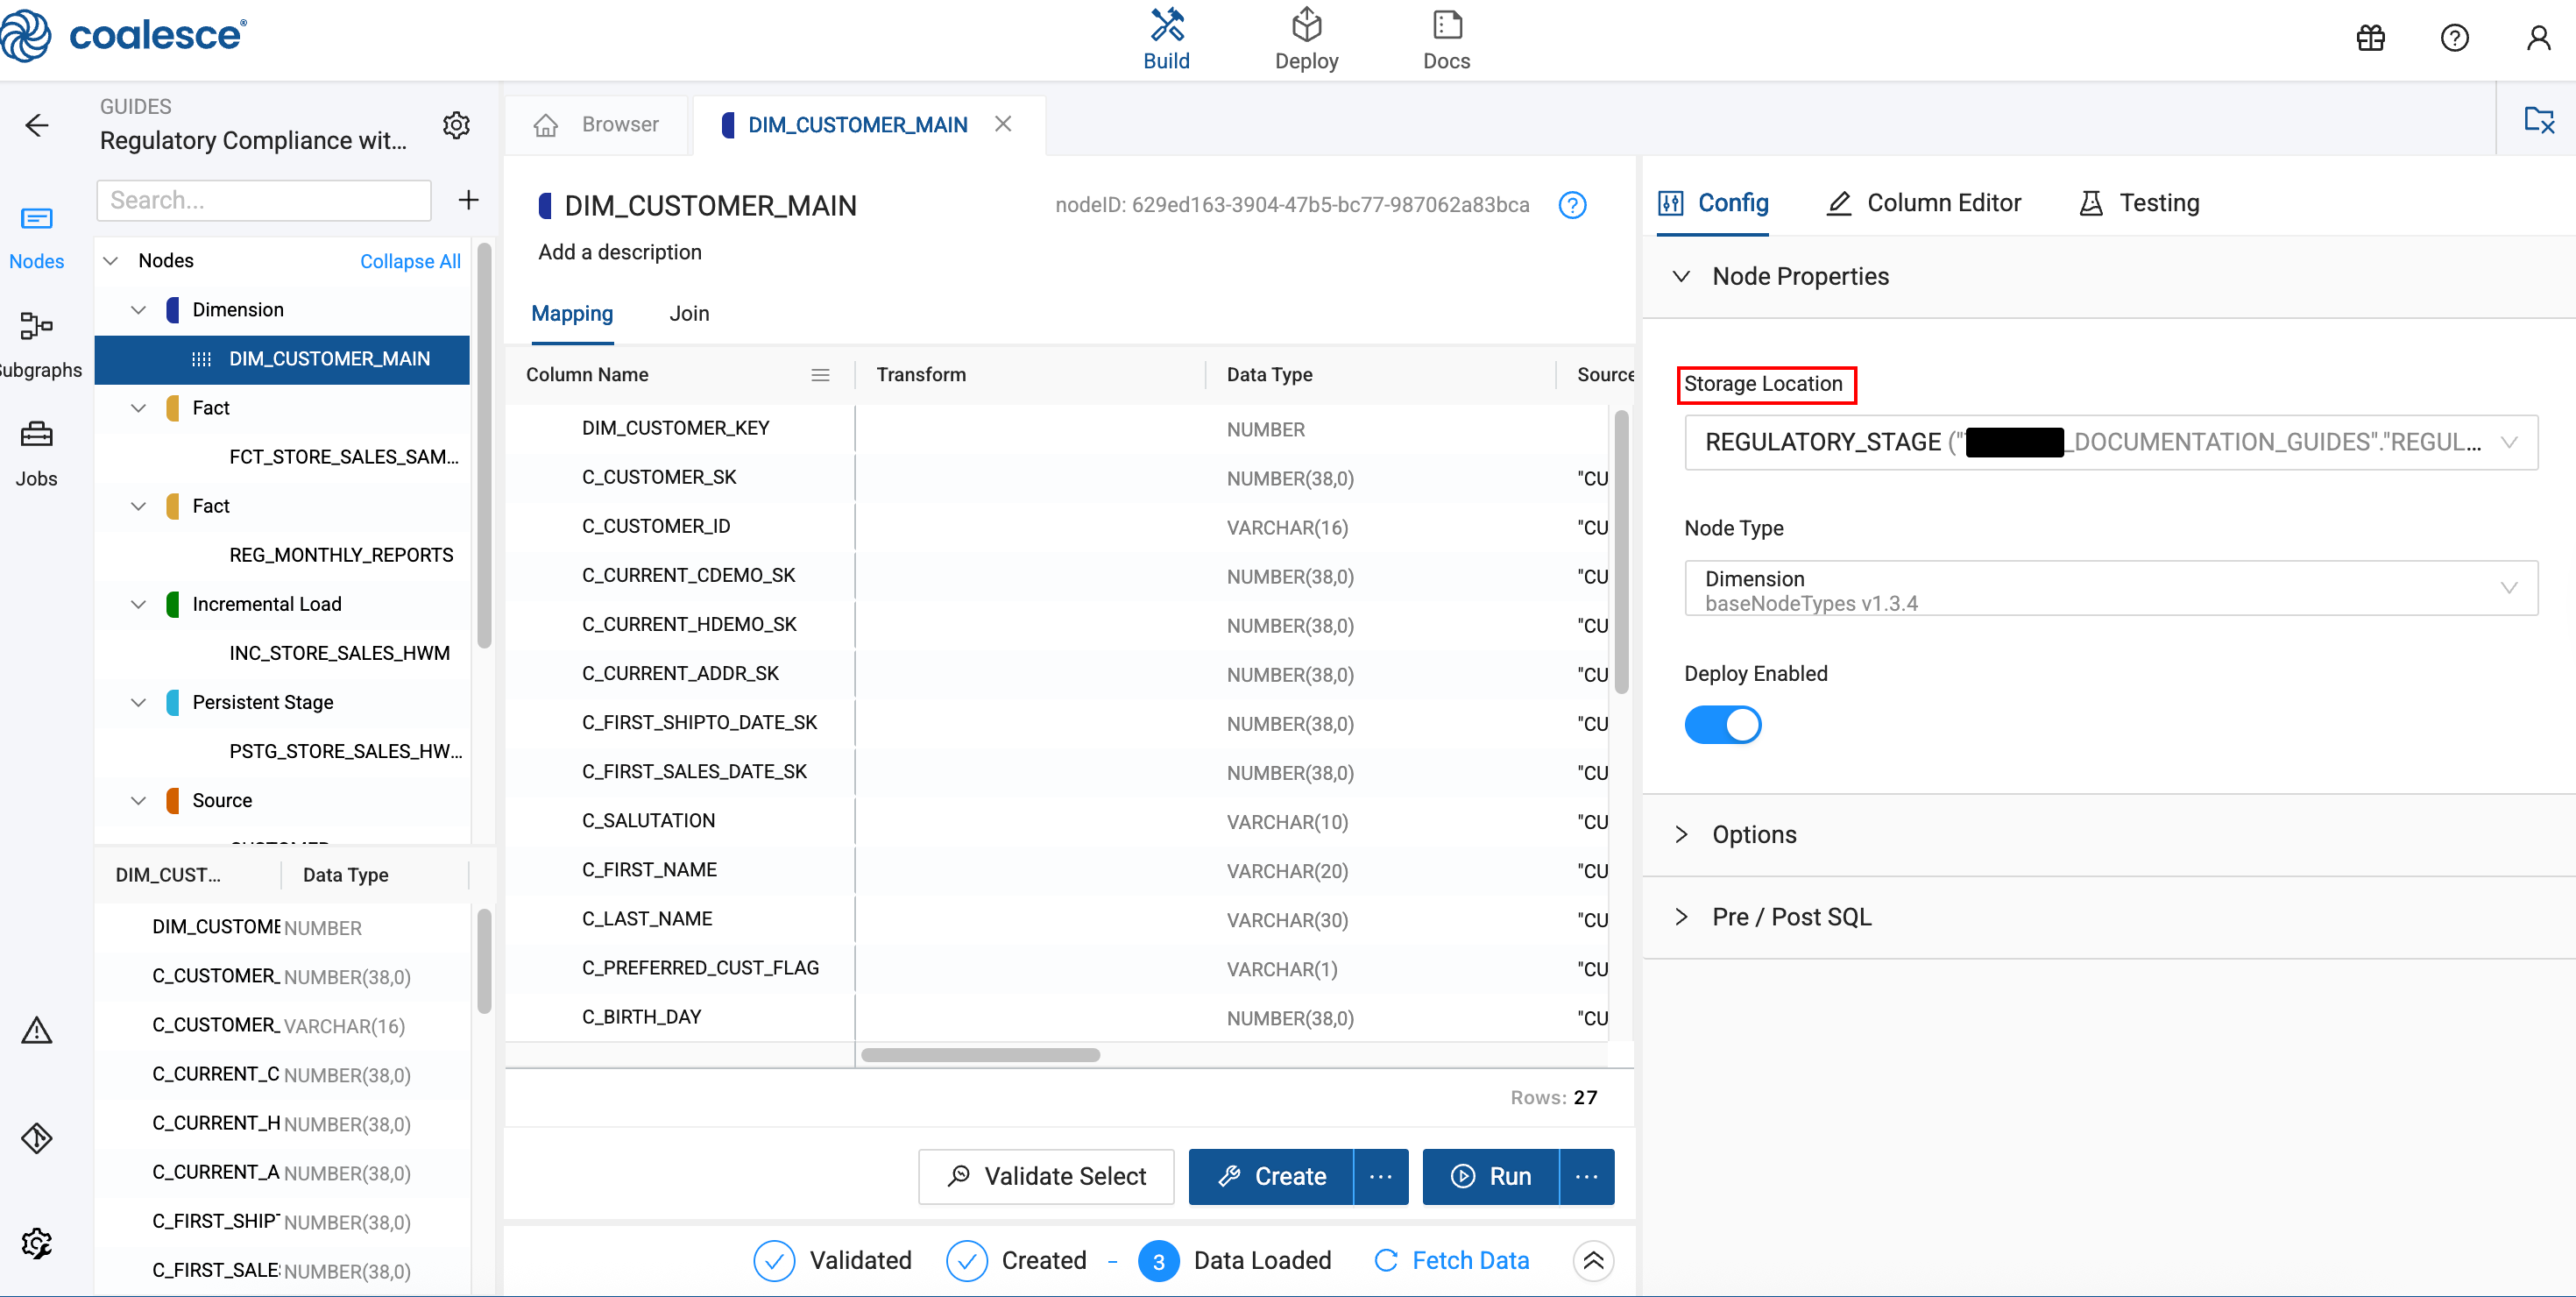
Configure Change Tracking and Business Keys
-
In the Options section, go to Business Key.
-
Select the column:
C_CUSTOMER_SK
-
Go to Change Tracking and select the following columns:
C_FIRST_NAMEC_LAST_NAMEC_EMAIL_ADDRESSC_PREFERRED_CUST_FLAG

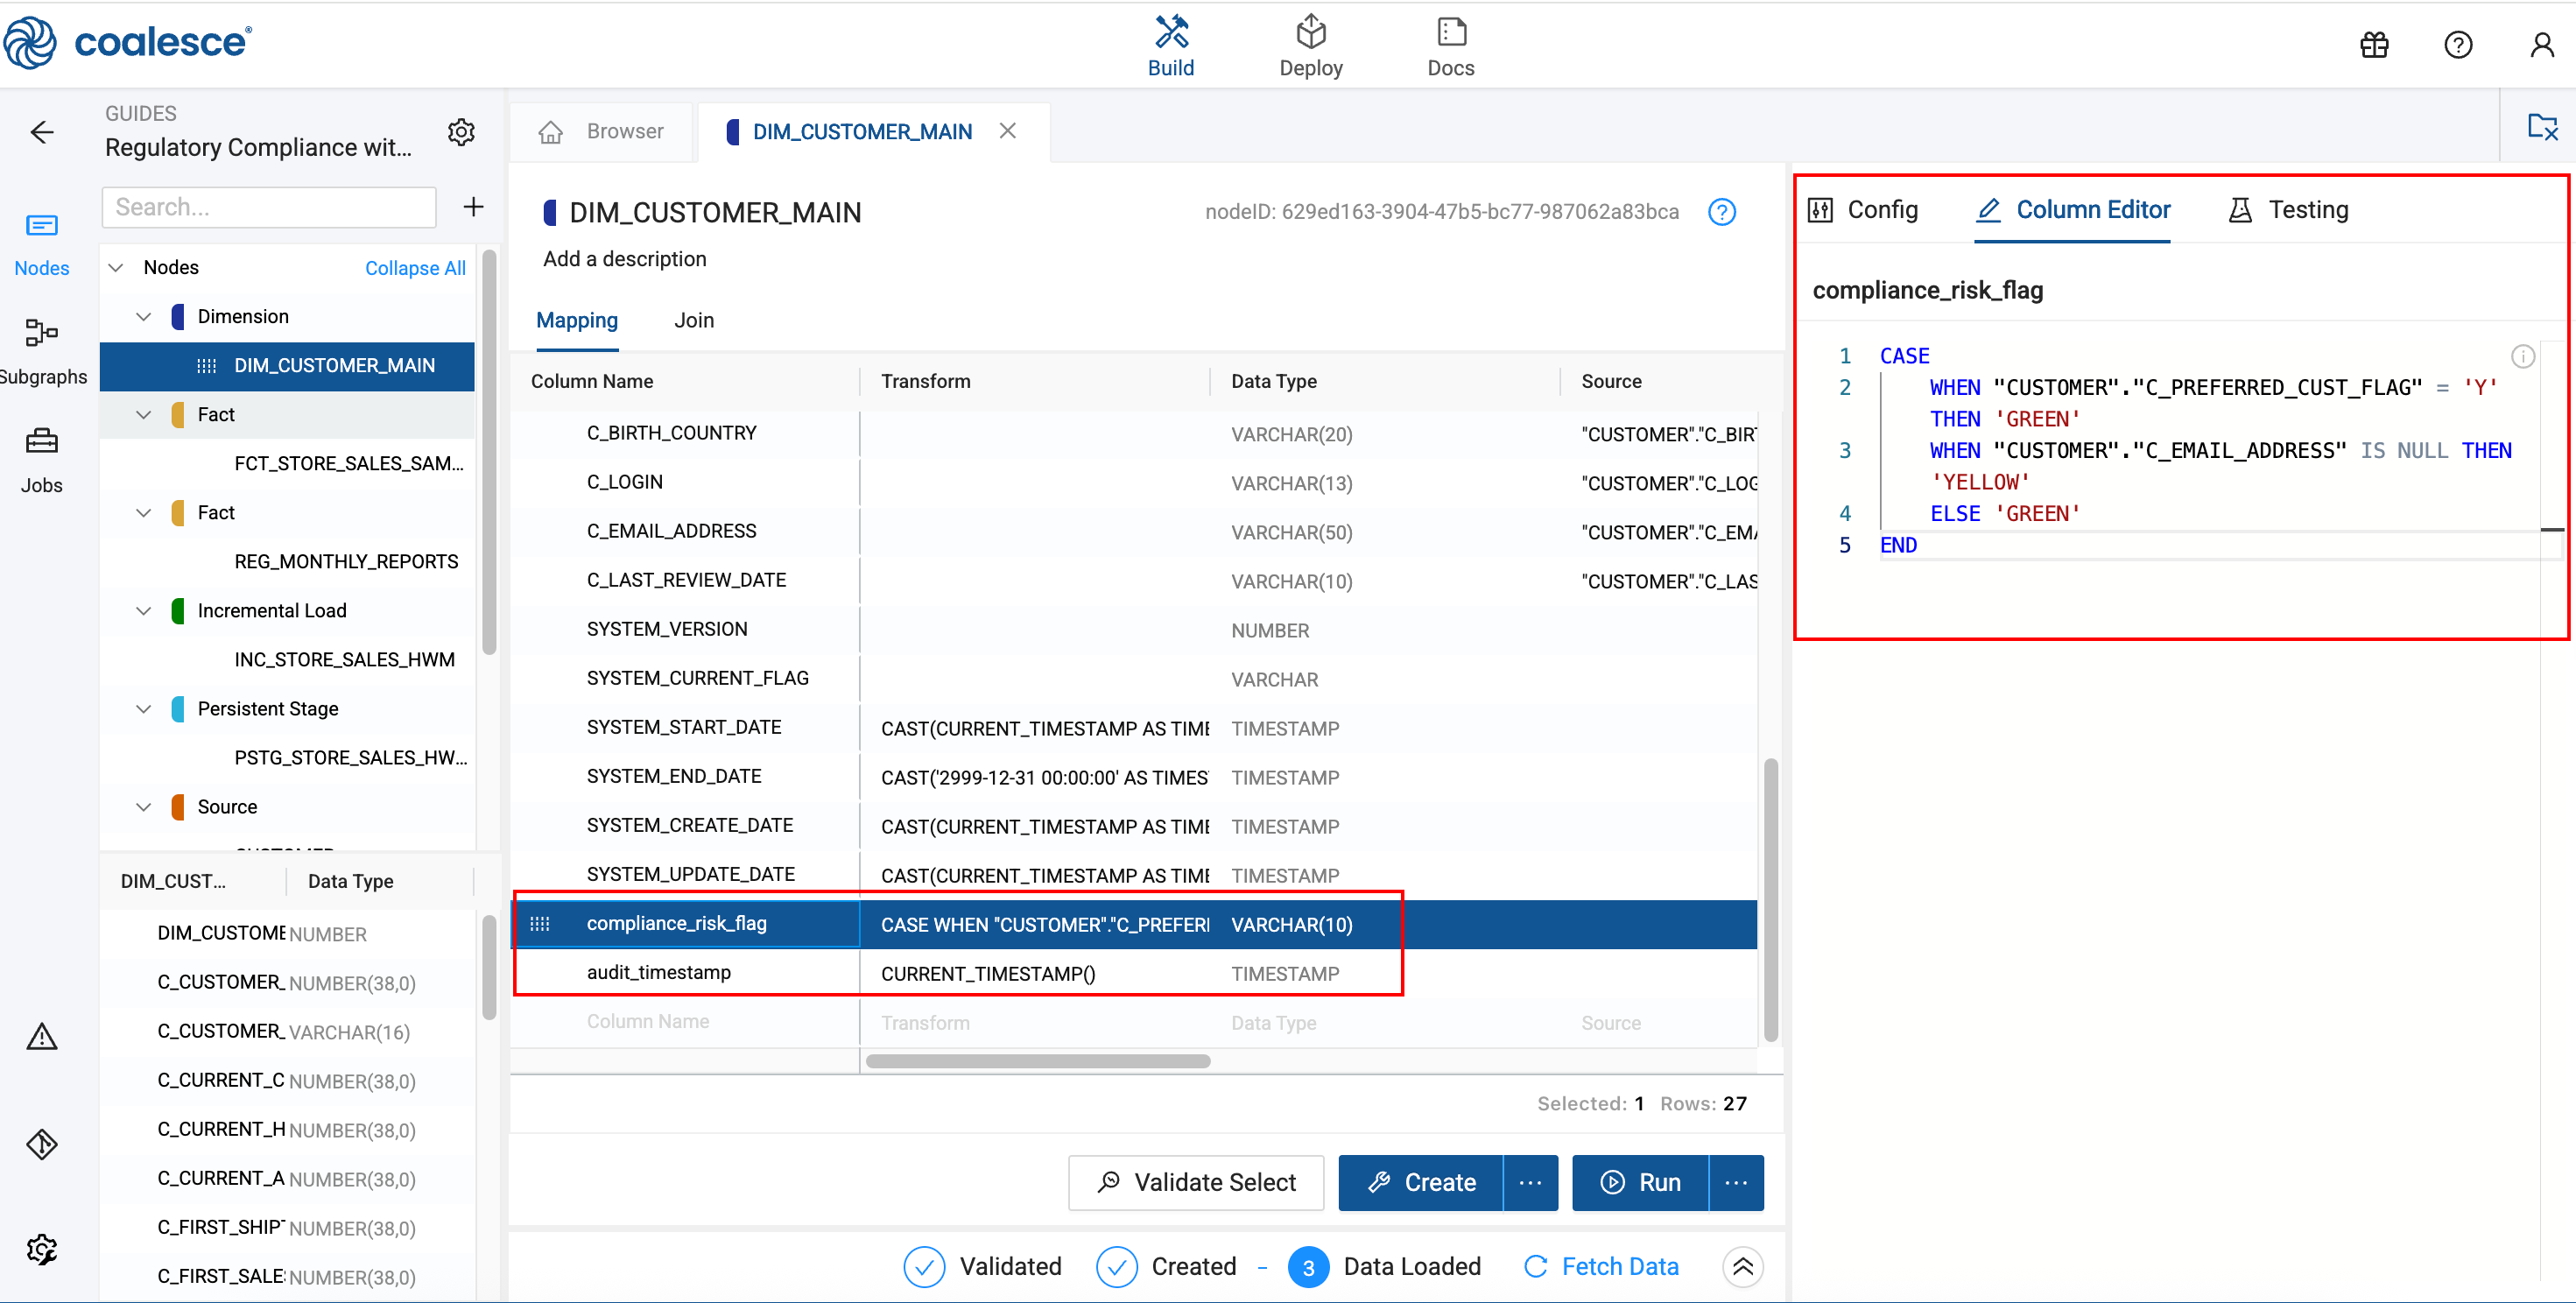
Add Compliance Risk Assessment
You'll add a compliance_risk_flag column. This risk flag helps identify customers requiring additional review based on missing contact information or preferred status. You can optionally add an audit_timestamp if required for compliance.
-
In the Mapping Grid, scroll to the bottom and add a new column by clicking in the empty row.
-
Configure the new column:
- Column Name:
compliance_risk_flag - Data Type:
VARCHAR(10) - Transformation:
CASEWHEN "CUSTOMER"."C_PREFERRED_CUST_FLAG" = 'Y' THEN 'GREEN'WHEN "CUSTOMER"."C_EMAIL_ADDRESS" IS NULL THEN 'YELLOW'ELSE 'GREEN'END - Column Name:
-
Click Create to build the Dimension Node.
Implementing Incremental Processing
The STORE_SALES table contains billions of rows, making full table scans impractical. We'll implement an incremental loading pattern to process only new transactions.
Understanding the Challenge
The STORE_SALES table is massive (2.8+ billion rows) and static. To demonstrate incremental loading in this tutorial, we'll use a filtering pattern that simulates new data arriving over time.
Create the Filtering View
This view will control which data is visible to our incremental logic, simulating a real-world scenario where new data arrives continuously.
-
Right-click the STORE_SALES source Node and select Add Node > Base Node Types Package > View.
-
Rename the Node to
STG_SALES_FILTERED. -
Set the Storage Location to
REGULATORY_STAGE. -
In Options, enable Override Create SQL.
-
In the Create SQL, update the script to include the following WHERE clause:
WHERE "SS_SOLD_DATE_SK" < 2452000.STG_SALES_FILTERED Create SQL Full Example{{ stage('Override Create SQL') }}CREATE OR REPLACE VIEW {{ ref('REGULATORY_STAGE', 'STG_SALES_FILTERED')}} AS (SELECT"SS_SOLD_DATE_SK" AS "SS_SOLD_DATE_SK","SS_SOLD_TIME_SK" AS "SS_SOLD_TIME_SK","SS_ITEM_SK" AS "SS_ITEM_SK","SS_CUSTOMER_SK" AS "SS_CUSTOMER_SK","SS_CDEMO_SK" AS "SS_CDEMO_SK","SS_HDEMO_SK" AS "SS_HDEMO_SK","SS_ADDR_SK" AS "SS_ADDR_SK","SS_STORE_SK" AS "SS_STORE_SK","SS_PROMO_SK" AS "SS_PROMO_SK","SS_TICKET_NUMBER" AS "SS_TICKET_NUMBER","SS_QUANTITY" AS "SS_QUANTITY","SS_WHOLESALE_COST" AS "SS_WHOLESALE_COST","SS_LIST_PRICE" AS "SS_LIST_PRICE","SS_SALES_PRICE" AS "SS_SALES_PRICE","SS_EXT_DISCOUNT_AMT" AS "SS_EXT_DISCOUNT_AMT","SS_EXT_SALES_PRICE" AS "SS_EXT_SALES_PRICE","SS_EXT_WHOLESALE_COST" AS "SS_EXT_WHOLESALE_COST","SS_EXT_LIST_PRICE" AS "SS_EXT_LIST_PRICE","SS_EXT_TAX" AS "SS_EXT_TAX","SS_COUPON_AMT" AS "SS_COUPON_AMT","SS_NET_PAID" AS "SS_NET_PAID","SS_NET_PAID_INC_TAX" AS "SS_NET_PAID_INC_TAX","SS_NET_PROFIT" AS "SS_NET_PROFIT"FROM {{ ref('REGULATORY_RAW', 'STORE_SALES_SAMPLE') }}WHERE "SS_SOLD_DATE_SK" < 2452000) -
Click Create to build the view.
Create the Incremental Logic
Now we'll add the high-water mark logic that identifies new records.
-
Right-click
STG_SALES_FILTEREDand select Add Node > Incremental Loading > Incremental Load. -
Rename the Node to
INC_STORE_SALES_HWM. -
In the Options tab, configure:
- Materialization:
View - Filter data based on Persistent Table:
True - Persistent Table Location:
REGULATORY_STAGE - Persistent Table Name:
PSTG_STORE_SALES_HWM - Incremental Load Column:
SS_SOLD_DATE_SK

- Materialization:
-
Navigate to the Join tab and click Generate Join.
-
Click Copy to Editor to populate the SQL.
-
Verify the generated SQL. You'll need to update
1900-01-01to0.-- Find this line:SELECT COALESCE(MAX("SS_SOLD_DATE_SK"), '1900-01-01')-- Correct it to:SELECT COALESCE(MAX("SS_SOLD_DATE_SK"), '0')--Final SQLFROM{{ ref('REGULATORY_STAGE', 'STG_SALES_FILTERED') }} "STG_SALES_FILTERED"WHERE "STG_SALES_FILTERED"."SS_SOLD_DATE_SK" >(SELECT COALESCE(MAX("SS_SOLD_DATE_SK"), '0')FROM {{ ref_no_link('REGULATORY_STAGE', 'PSTG_STORE_SALES_HWM') }} ) -
Create the View.
The generated code may use a date string as the default value. Since SS_SOLD_DATE_SK is an integer, you must change this to 0 or the query will fail.
Create the Persistent Staging Table
This table stores the incrementally loaded transaction data.
-
Right-click
INC_STORE_SALES_HWMand select Add Node > Base Node Types Package > Persistent Stage. -
Rename the Node to
PSTG_STORE_SALES_HWM. -
Configure the Node:
- Storage Location:
REGULATORY_STAGE - Business Key:
SS_SOLD_DATE_SKSS_CUSTOMER_SKSS_ITEM_SKSS_TICKET_NUMBER
- Storage Location:
Add Compliance Columns
-
In the Mapping Grid, add two custom columns:
Transaction Flag Column:
- Column Name:
transaction_flag - Data Type:
VARCHAR(15) - Transformation:
CASEWHEN "INC_STORE_SALES_HWM"."SS_NET_PAID" > 10000 THEN 'AML_REVIEW'ELSE 'NORMAL'ENDAudit Timestamp Column (optional):
- Column Name:
audit_processed_timestamp - Data Type:
TIMESTAMP_NTZ - Transformation:
CURRENT_TIMESTAMP()System Generated ColumnsYou'll notice some columns that are automatically generated. These can be used for compliance or a custom column can be added such as
audit_processed_timestamp. In this example,SYSTEM_UPDATE_DATEtracks the last modification to the record. Learn more about System Columns. - Column Name:
-
Click Create to build the staging table.
Running the Initial Load
Let's perform the first run to load our partial dataset.
-
In Snowflake, ensure the target table is empty:
TRUNCATE TABLE YOUR_DB.REGULATORY_STAGE.PSTG_STORE_SALES_HWM; -
In Coalesce, click on
PSTG_STORE_SALES_HWMand click Run. -
Monitor the run progress. This will load all records where
SS_SOLD_DATE_SK < 2452000.
Note the execution time and row count. This establishes your baseline for comparing incremental load performance.
Creating the Regulatory Fact Table
This fact table combines transaction data with current customer information for compliance analysis.
Build the Fact Node
- Right-click
PSTG_STORE_SALES_HWMand select Add Node > Base Node Types Package > Fact. - Rename the Node to
FCT_STORE_SALES_SAMPLE. - Configure the Node:
- Storage Location:
REGULATORY_MART - Business Key:
SS_SOLD_DATE_SKSS_CUSTOMER_SKSS_ITEM_SKSS_TICKET_NUMBER
- Storage Location:
Join Customer Dimension
Navigate to the Join tab and enter:
FROM {{ ref('REGULATORY_STAGE','PSTG_STORE_SALES_HWM') }} "PSTG_STORE_SALES_HWM"
JOIN {{ ref('REGULATORY_STAGE','DIM_CUSTOMER_MAIN') }} "DIM_CUSTOMER_MAIN"
ON "PSTG_STORE_SALES_HWM"."SS_CUSTOMER_SK" = "DIM_CUSTOMER_MAIN"."C_CUSTOMER_SK"
AND "DIM_CUSTOMER_MAIN"."SYSTEM_END_DATE" = '2999-12-31 00:00:00'
The JOIN condition on SYSTEM_END_DATE ensures we only use the current version of each customer record.
Add Risk Assessment
-
In the Mapping Grid, add a custom column:
- Column Name:
customer_risk_assessment - Data Type:
VARCHAR(20) - Transformation:
CASEWHEN "DIM_CUSTOMER_MAIN"."compliance_risk_flag" = 'YELLOW' AND "PSTG_STORE_SALES_HWM"."SS_NET_PAID" > 10000 THEN 'HIGH_RISK'WHEN "PSTG_STORE_SALES_HWM"."SS_NET_PAID" > 10000 THEN 'MEDIUM_RISK'ELSE 'LOW_RISK'END - Column Name:
-
There are duplicate
SYSTEMcolumns. Delete theSYSTEM_CREATE_DATEand theSYSTEM_UPDATE_DATEautomatically created in theFCT_STORE_SALES_SAMPLEtable by right-clicking and Delete Column. You are keeping the ones from the NodePSTG_STORE_SALES_HWMto keep the audit history. They would only track when they were inserted into the Fact table.
Delete the SYSTEM_CREATE_DATE and SYSTEM_UPDATE_DATE. -
Click Create and Run to build the Fact table.
Build the Compliance Reports
Customer 360 View
Create a comprehensive customer profile with transaction history.
-
Right-click
DIM_CUSTOMER_MAINand select Add Node > Base Node Types Packages > View. -
Rename to
CUSTOMER_360_VIEW. -
Change the Storage Location to
REGULATORY_MART. -
In the Join tab, add:
FROM {{ ref('REGULATORY_STAGE','DIM_CUSTOMER_MAIN') }} "DIM_CUSTOMER_MAIN"LEFT JOIN {{ ref('REGULATORY_MART','FCT_STORE_SALES_SAMPLE') }} "FCT_STORE_SALES_SAMPLE"ON "DIM_CUSTOMER_MAIN"."C_CUSTOMER_SK" = "FCT_STORE_SALES_SAMPLE"."SS_CUSTOMER_SK"WHERE "DIM_CUSTOMER_MAIN"."SYSTEM_END_DATE" = '2999-12-31 00:00:00' -
In Options, toggle Group By All to
True. -
Add aggregation columns with the transformations in the Mapping Grid:
total_transactions (NUMBER)- COUNT(FCT_STORE_SALES_SAMPLE.SS_TICKET_NUMBER)total_amount (NUMBER) - COALESCE(SUM(FCT_STORE_SALES_SAMPLE.SS_NET_PAID), 0)high_risk_transaction_count (VARCHAR(10)) - COUNT(CASE WHEN "FCT_STORE_SALES_SAMPLE"."customer_risk_assessment" = 'HIGH_RISK' THEN 1 END) -
Create the Node.
Exception Detection View
Monitor high-risk transactions requiring regulatory review.
-
Right-click
FCT_STORE_SALES_SAMPLEand select Add Node > Base Node Types Package > View. -
Rename to
EXCEPTION_DETECTION_VIEW. -
Change the Storage Location to
REGULATORY_MART. -
In the Join tab, add the WHERE clause:
FROM {{ ref('REGULATORY_MART', 'FCT_STORE_SALES_SAMPLE') }} "FCT_STORE_SALES_SAMPLE"WHERE "FCT_STORE_SALES_SAMPLE"."customer_risk_assessment" = 'HIGH_RISK'OR "FCT_STORE_SALES_SAMPLE"."SS_NET_PAID" > 10000 -
Create the Node.
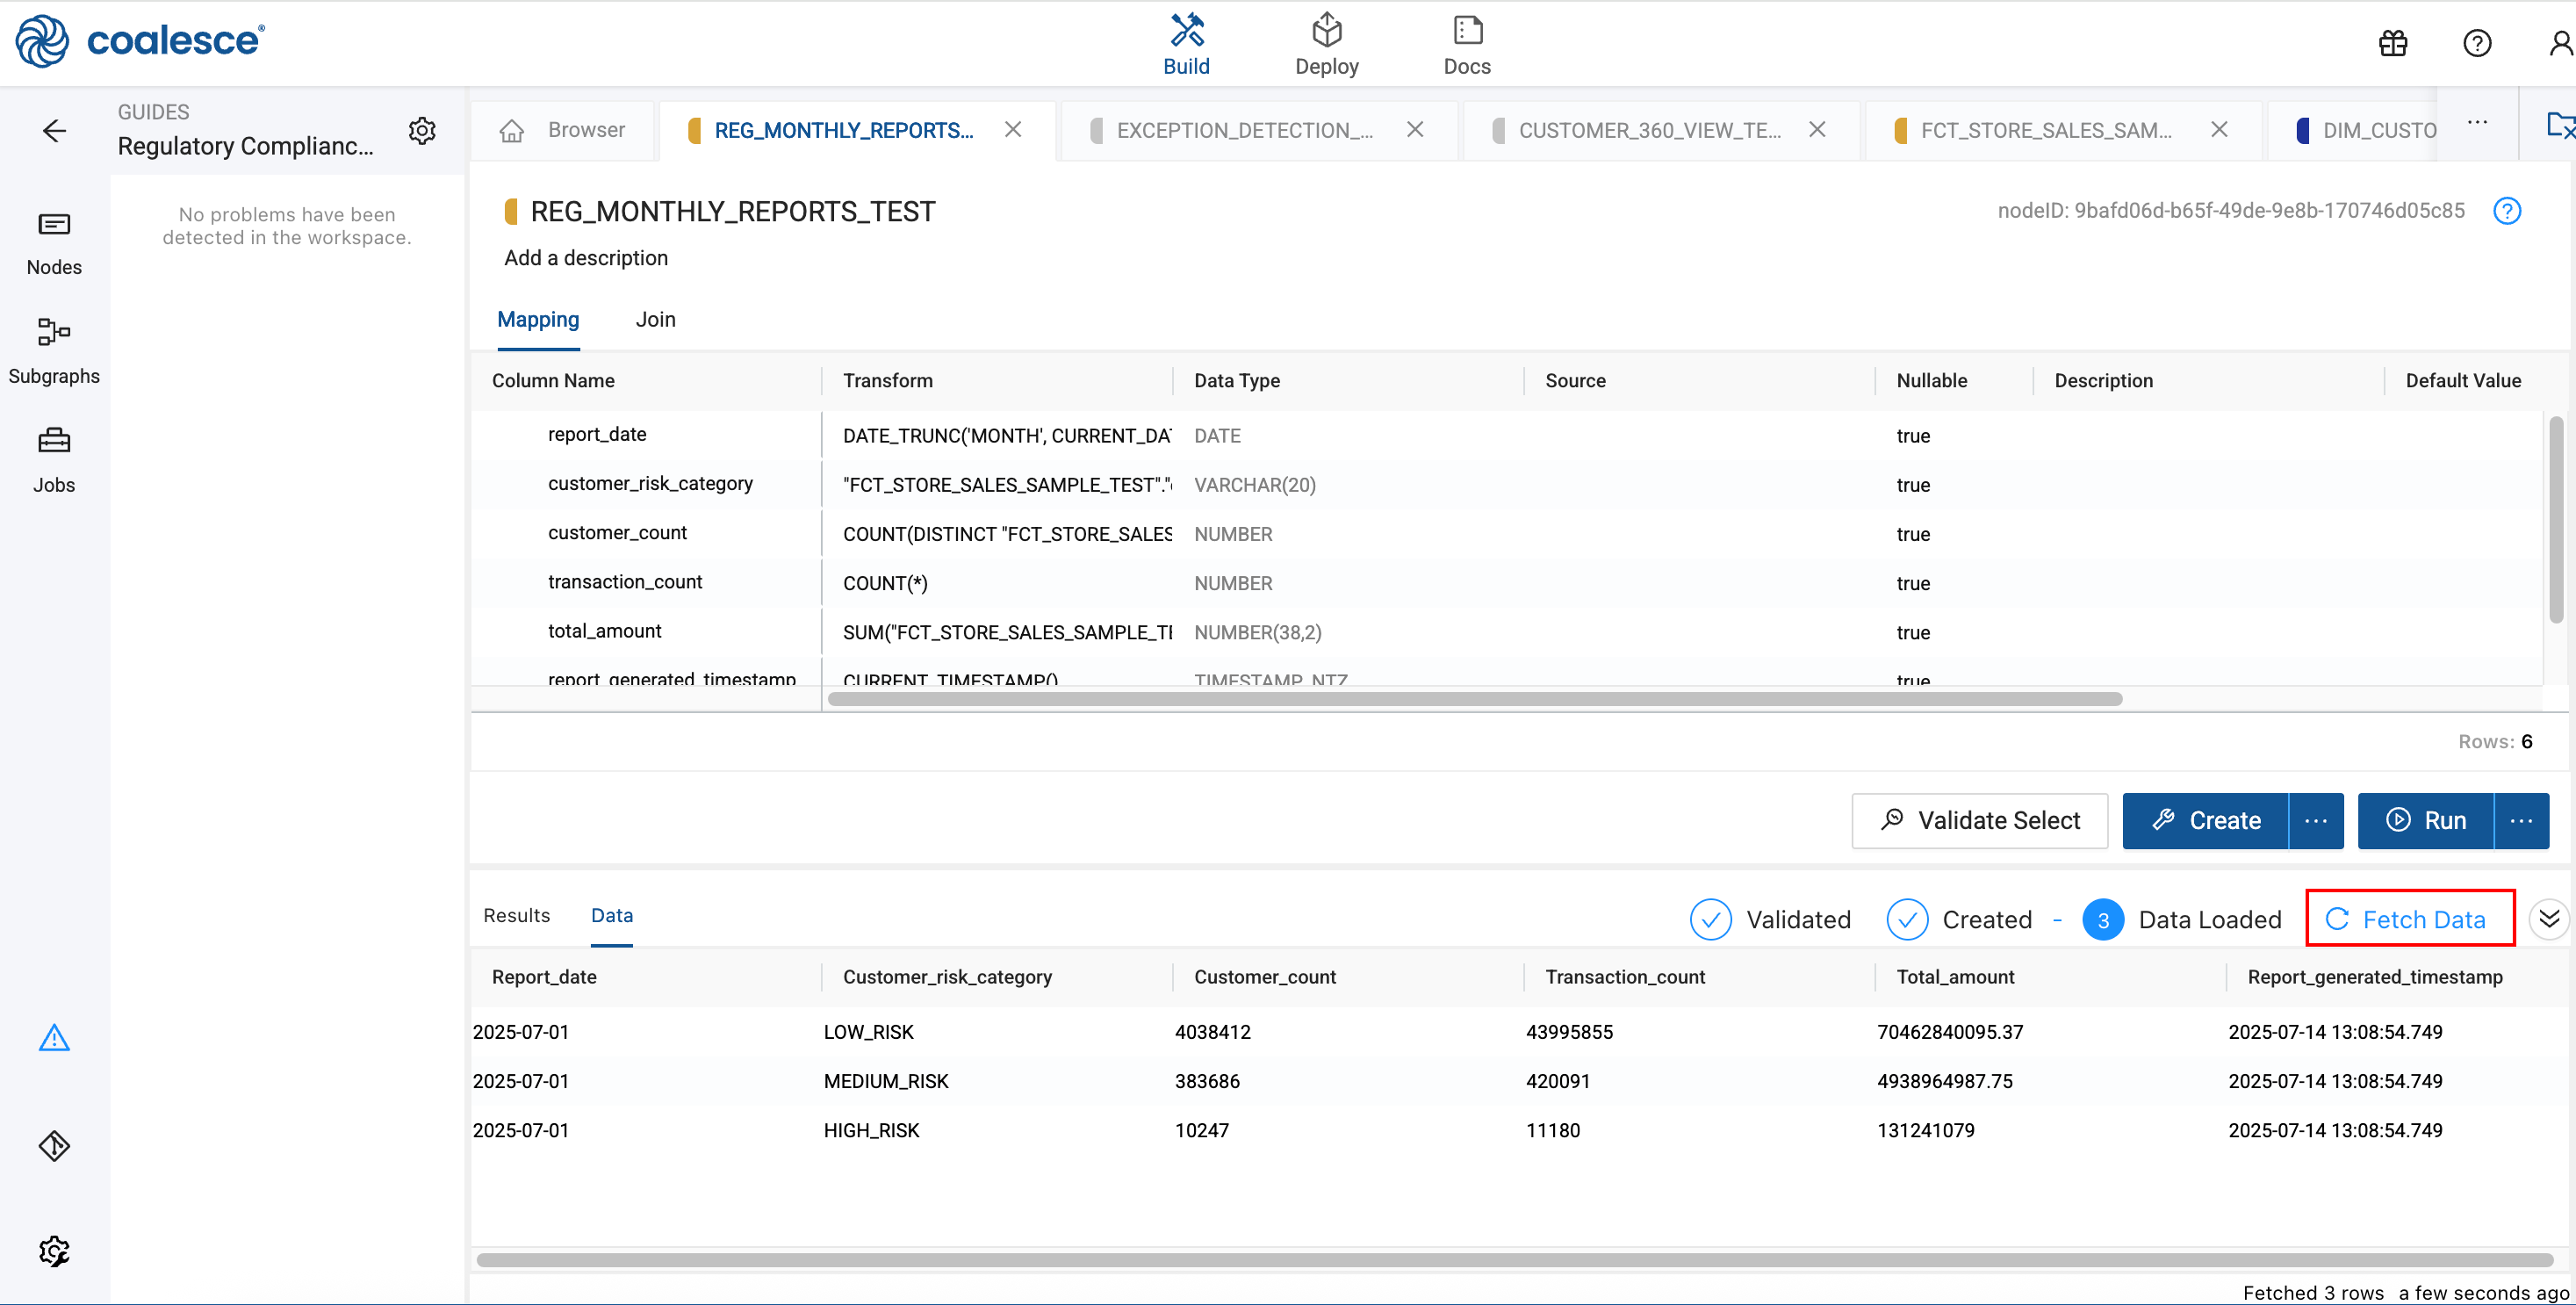
Monthly Regulatory Report
Create an audit report snapshot for compliance reporting.
-
Right-click
FCT_STORE_SALES_SAMPLEand select Add Node > Base Node Types Packages > Fact. -
Rename to
REG_MONTHLY_REPORTS. -
Delete all columns, and add the following columns.
Column Name Transformation Data Type report_dateDATE_TRUNC('MONTH', CURRENT_DATE())DATEcustomer_risk_category"FCT_STORE_SALES_SAMPLE"."customer_risk_assessment"VARCHAR(20)customer_countCOUNT(DISTINCT "FCT_STORE_SALES_SAMPLE"."SS_CUSTOMER_SK")NUMBERtransaction_countCOUNT(*)NUMBERtotal_amountSUM("FCT_STORE_SALES_SAMPLE"."SS_NET_PAID")NUMBER(38,2)report_generated_timestampCURRENT_TIMESTAMP()TIMESTAMP_NTZ -
Configure the Business Key:
report_datecustomer_risk_category
-
In the Join tab:
FROM {{ ref('REGULATORY_MART', 'FCT_STORE_SALES_SAMPLE') }} "FCT_STORE_SALES_SAMPLE"GROUP BY 1, 2 -
Create the Node.
Regulatory reports must be static, historical snapshots. A Fact Node materializes the data, creating a permanent record for each reporting period. Views would show live data, which isn't suitable for audit purposes.
Testing the Incremental Load
Now let's simulate new data arriving and verify our incremental processing works correctly.
Run the Pipeline
-
Return to the
STG_SALES_FILTEREDview. -
Update the SQL to change the filter. This is to prevent all the rows being processed, but simulating new data.
WHERE "SS_SOLD_DATE_SK" < 2452100 -
Click Create.
-
Go to the DAG and click Run All.
-
Verify the new data appears in your reports by opening one of the reports and click on Fetch Data if the data isn't already loaded.
Conclusion and Next Steps
Congratulations. You've built a production-ready compliance pipeline that demonstrates enterprise data engineering best practices.
What You've Accomplished
- Created an efficient incremental loading system
- Implemented audit-compliant customer history tracking
- Built automated compliance reporting
- Established a scalable pipeline architecture
Next Steps
- Explore adding data quality checks using Coalesce's testing framework
- Implement automated scheduling for regular report generation
- Add additional compliance rules based on your organization's needs
- Consider integrating with external compliance systems