Documentation index: llms.txt. This page is also available as markdown: append .md to this URL or send Accept: text/markdown.
Dust Integration
Connect the Catalog AI Assistant to Dust so workspace users can ask data questions from Dust chat. You store a Catalog API token as a Dust app secret, build a Dust app that submits and polls the AI Assistant API, and attach that app to a Dust agent with a structured instruction prompt.
Prerequisites
- You need
adminaccess in Dust. - You need a Catalog API token with Read & Write scope. Catalog administrators create tokens in Settings > API. See Getting Your Catalog API Keys for generation and rotation steps.
- Review Introduction to Dust apps if you are new to Dust app blocks.
Installation Overview
The Dust agent is created at the workspace level. Once set up, it is accessible to all users in your workspace.
- Set the Catalog API token as a Dust app secret named
CATALOG_API_TOKEN. - Create and configure the
coalesceAiAssistantDust app with the blocks in Build the Dust App Blocks. - Create a Dust agent that runs the app as a tool and uses the Agent instruction prompt below.
Set the Catalog API Token as a Dust App Secret
Secrets let Dust apps reference sensitive values without exposing them in block definitions.
- Open the Admin tab in the top left menu.
- Go to Developers > Secrets in the left menu.
- Click Create Secret.
- Set the secret name to
CATALOG_API_TOKEN, paste the token value, and click Create.
Create the Dust App Shell
Create an empty app before you add blocks:
- Go to the Spaces tab in the top left menu.
- Go to Open Spaces > Apps.
- Click Create a new app.
- Set the app name to coalesceAiAssistant and the description to Calling the Catalog AI Assistant to answer your question and show helpful assets.
The app calls the Catalog public API in two phases: submit a question with addAiAssistantJob, then poll getAiAssistantJobResult until the job completes. See AI Assistant API for the underlying GraphQL operations.
Build the Dust App Blocks
Add the following blocks to coalesceAiAssistant in this order. Block names are case-sensitive and must match the names referenced in the code.
| Block | Type | Purpose |
|---|---|---|
INPUT | input | Receives question, email, and conversationId from the agent |
CONFIG | code | Sets MAX_POLLS and DELAY_SECONDS reused by later blocks |
GET_JOB_ID | curl | Submits the question to Catalog and returns a jobId |
CHECK_JOB_ID | code | Parses the GET_JOB_ID response and surfaces errors |
POLLING | while | Loops until the job reaches a terminal status or hits the poll limit |
POLL_API | curl | Nested inside POLLING; polls for the AI Assistant result |
SUMMARY | code | Formats the final answer and assets for the agent |
Use the API base URL that matches your Catalog region:
- EU:
https://api.castordoc.com/public/graphql - US:
https://api.us.castordoc.com/public/graphql
Append the operation query parameter to each curl block URL, for example ?op=addAiAssistantJob or ?op=getAiAssistantJobResult.
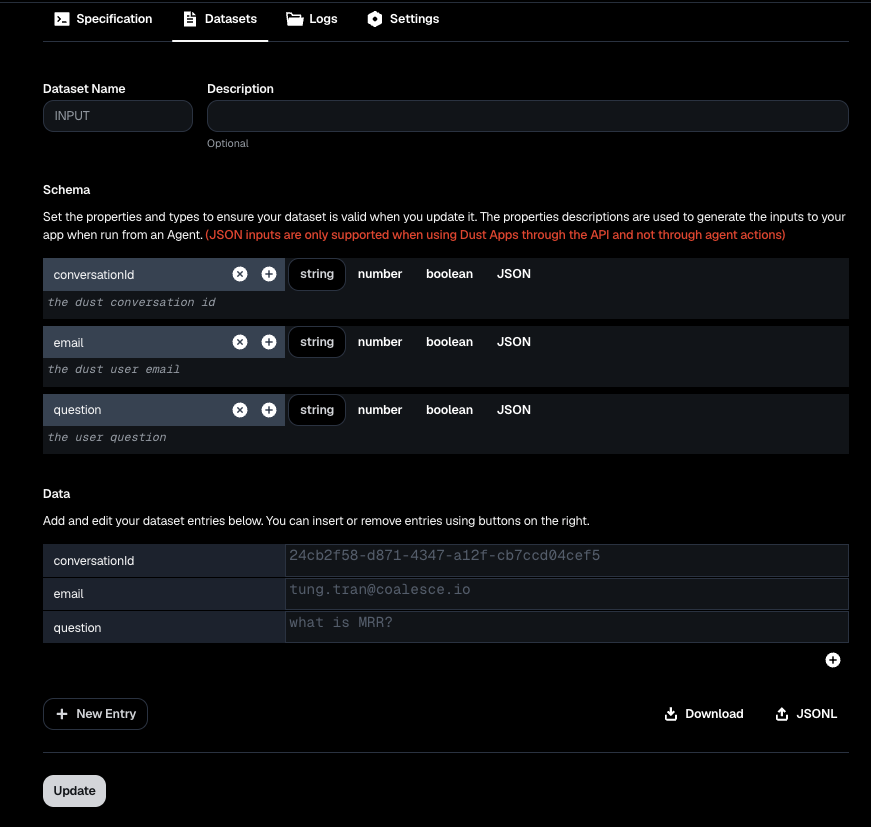
INPUT Block
- On the Specification tab, click Add Block and add an input block.
- Set the block name to
INPUT. - Open Datasets, create a dataset named
INPUT, and define these string fields:conversationId,email, andquestion. - Return to Specification, select the
INPUTblock, and set Dataset toINPUT.


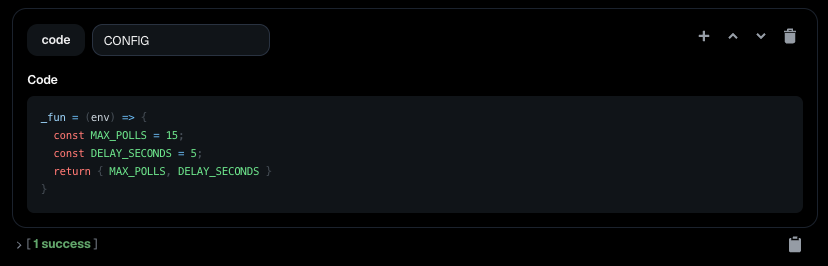
Configure Polling Constants
- Add a code block and name it
CONFIG(the block name must match exactly). - Paste this code:
_fun = (env) => {
  const MAX_POLLS = 15;
  const DELAY_SECONDS = 5;
  return { MAX_POLLS, DELAY_SECONDS }
}
Your block should look like this:
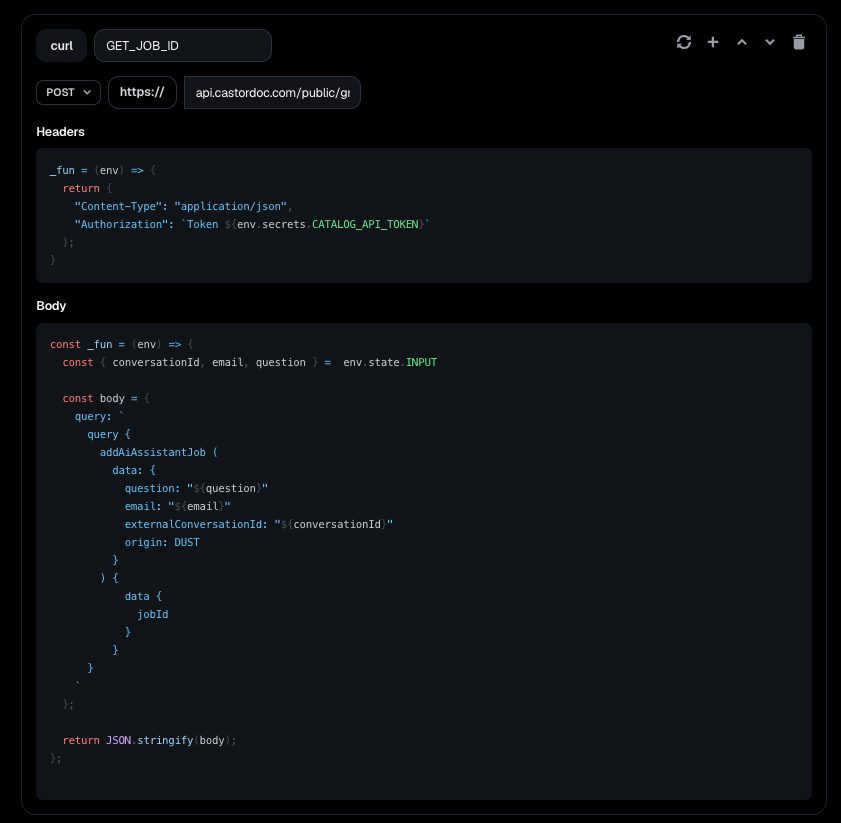
GET_JOB_ID Block
- Add a curl block and name it
GET_JOB_ID. - Set the request to POST with your region URL and
?op=addAiAssistantJob. - Paste the Headers and Body code below into the block.
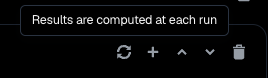
- Enable Results are computed at each run on the block settings.
Headers:
_fun = (env) => {
  return {
    "Content-Type": "application/json",
    "Authorization": `Token ${env.secrets.CATALOG_API_TOKEN}`
  };
}
Body:
const _fun = (env) => {
  const { conversationId, email, question } = env.state.INPUT;

  const toGraphQLString = (value) =>
    JSON.stringify(String(value ?? '')).slice(1, -1);

  const body = {
    query: `
      query {
        addAiAssistantJob (
          data: {
            question: "${toGraphQLString(question)}"
            email: "${toGraphQLString(email)}"
            externalConversationId: "${toGraphQLString(conversationId)}"
            origin: DUST
          }
        ) {
          data {
            jobId
          }
        }
      }
    `
  };

  return JSON.stringify(body);
};
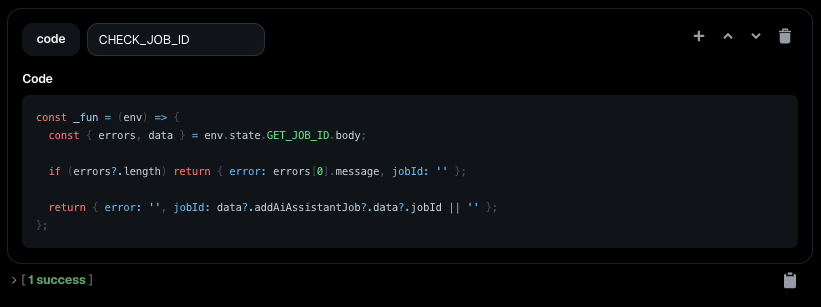
CHECK_JOB_ID Block
- Add a code block and name it
CHECK_JOB_ID. - Paste this code:
const _fun = (env) => {
  const { errors, data } = env.state.GET_JOB_ID.body;

  if (errors?.length) return { error: errors[0].message, jobId: '' };

  return { error: '', jobId: data?.addAiAssistantJob?.data?.jobId || '' };
};
Your block should look like this:
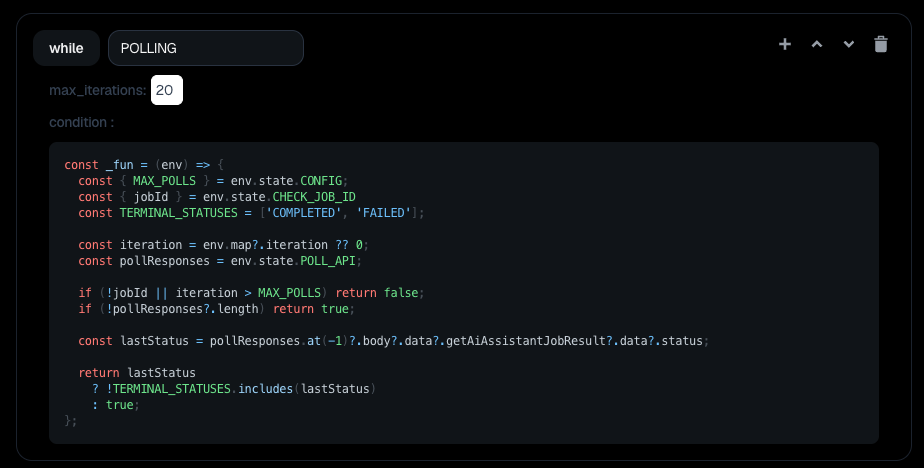
POLLING and POLL_API Blocks
Add the polling loop and its nested curl block together.
- Add a while block and name it
POLLING. - Set the maximum iteration count to
20in the block settings. - Paste the condition code below into the block.
- Inside the
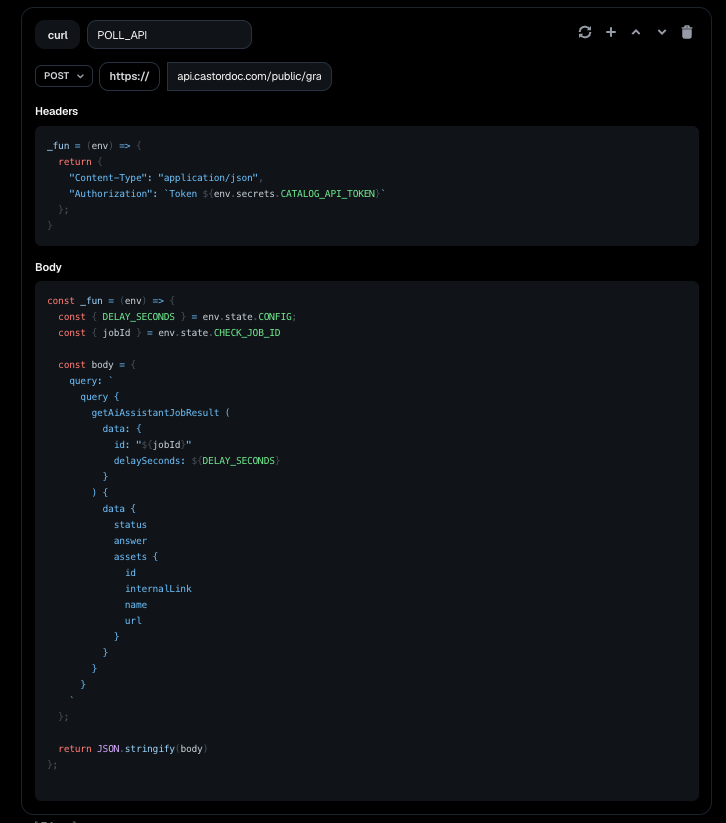
POLLINGblock, add a curl block namedPOLL_API. - Set the
POLL_APIrequest to POST with your region URL and?op=getAiAssistantJobResult. - Reuse the same Headers code as
GET_JOB_ID, paste the Body code below, and enable Results are computed at each run onPOLL_API.
Create POLL_API inside the POLLING block, not at the top level of the app.
POLLING condition:
const _fun = (env) => {
  const { MAX_POLLS } = env.state.CONFIG;
  const { jobId } = env.state.CHECK_JOB_ID;
  const TERMINAL_STATUSES = ['completed', 'failed'];

  const iteration = env.map?.iteration ?? 0;
  const pollResponses = env.state.POLL_API;

  if (!jobId || iteration > MAX_POLLS) return false;
  if (!pollResponses?.length) return true;

  const lastStatus = pollResponses.at(-1)?.body?.data?.getAiAssistantJobResult?.data?.status;

  return lastStatus
    ? !TERMINAL_STATUSES.includes(lastStatus)
    : true;
};
POLL_API Body:
const _fun = (env) => {
  const { DELAY_SECONDS } = env.state.CONFIG;
  const { jobId } = env.state.CHECK_JOB_ID;

  const body = {
    query: `
      query {
        getAiAssistantJobResult (
          data: {
            id: "${jobId}"
            delaySeconds: ${DELAY_SECONDS}
          }
        ) {
          data {
            status
            answer
            assets {
              id
              internalLink
              name
              url
            }
          }
        }
      }
    `
  };

  return JSON.stringify(body);
};
SUMMARY Block
- Add a code block and name it
SUMMARY. - Paste this code:
const _fun = (env) => {
  const { error } = env.state.CHECK_JOB_ID;
  if (error) return { answer: error, assets: [] };

  // Guard: POLL_API may be undefined if polling never ran (e.g. empty jobId)
  if (!env.state.POLL_API?.length) {
    return { answer: 'Unable to retrieve a job ID from the Catalog API. Please try again later.', assets: [] };
  }

  const result = env.state.POLL_API.at(-1)?.body?.data?.getAiAssistantJobResult?.data || {};
  const { status, answer } = result;

  if (status === 'failed') {
    return { answer: answer || 'The AI Assistant job failed. Please try again later.', assets: [] };
  }

  if (status !== 'completed') {
    return { answer: 'The AI Assistant job did not complete in time. Please try again later.', assets: [] };
  }

  const assets = (result.assets || []).map(({ name, url, internalLink }) => ({
    name,
    url: url || internalLink,
  }));

  return { answer: answer || '', assets };
};
Your block should look like this:

Create the Dust Agent
The CoalesceAiAssistant agent runs the coalesceAiAssistant app as a tool and formats responses for Dust users.
- Click Create > New Agent.
- Set Advanced settings: Model selection Claude Sonnet, recommended. Creativity level Deterministic, recommended.
- Copy and paste the Agent instruction prompt into the instructions field, then click Next.
- Remove all existing tools, then click Add tools > Run Dust app.
- Select the
coalesceAiAssistantapp and click Save, then Next. - Name the agent
CoalesceAiAssistant, update the icon, test in the bottom-right corner, and set access to Published.
Agent Instruction Prompt
Paste this prompt into the agent instructions field:
You are an assistant that answers user questions by querying a knowledge base tool. Your role is to process questions and return clean, structured responses.

## Process Flow

When a user asks a question:

1. Extract inputs
   - User's question from their message
   - User's email from system context
   - Conversation ID from system context: conversation_id

2. Call the tool with these parameters
   - question: string
   - email: string
   - conversationId: string

3. Process the JSON response

The tool returns this structure:

{
  "answer": "string - the answer to the user's question",
  "assets": [
    {
      "name": "string - display name for the asset",
      "url": "string - link to the asset"
    }
  ]
}

## Response Format

Structure your response exactly as follows:

- Display the answer from the answer field
- List assets when the assets array is not empty:
  - Format each asset as a Markdown link: [asset.name](asset.url)
  - Put each asset link on a separate line

## Error Handling

- If the answer is "NotFound: User was not found", respond: "You need a Coalesce Catalog account to use this assistant. Please contact your organization's admin to request access. They can set up your account with the necessary permissions."
- If the tool fails or returns an error: "I'm unable to process your request right now. Please try again later."

## Important Rules

- No additional commentary. Only include the answer and asset links.
- No explanations beyond what the tool provides.
- Always validate that assets have both name and url fields before formatting.
- Handle empty responses gracefully. Display the answer even when there are no assets.
- Maintain consistent formatting for all asset links.
Debug
- Tool inspection in the chat: Click Tool inspection in your chat box to view both the input and output of the tool.
- Tool logs: Each response from
CoalesceAiAssistanttriggers a tool call tocoalesceAiAssistant. View a detailed log of every call, including step-by-step output, by going to the app Logs > API.
Update
- The Dust agent uses the AI Assistant public API, so updates to the AI Assistant on the Catalog side are reflected in Dust automatically. Updates on the Catalog side are designed to be backward compatible. Catalog notifies you if an update requires action on your part.
- Because the Dust app and agent live in your Dust workspace, you are responsible for updating them when needed. Catalog notifies you if an update is required.